
Retopology in Blender 5.2: From Dense Sculpt to Animation-Ready Mesh

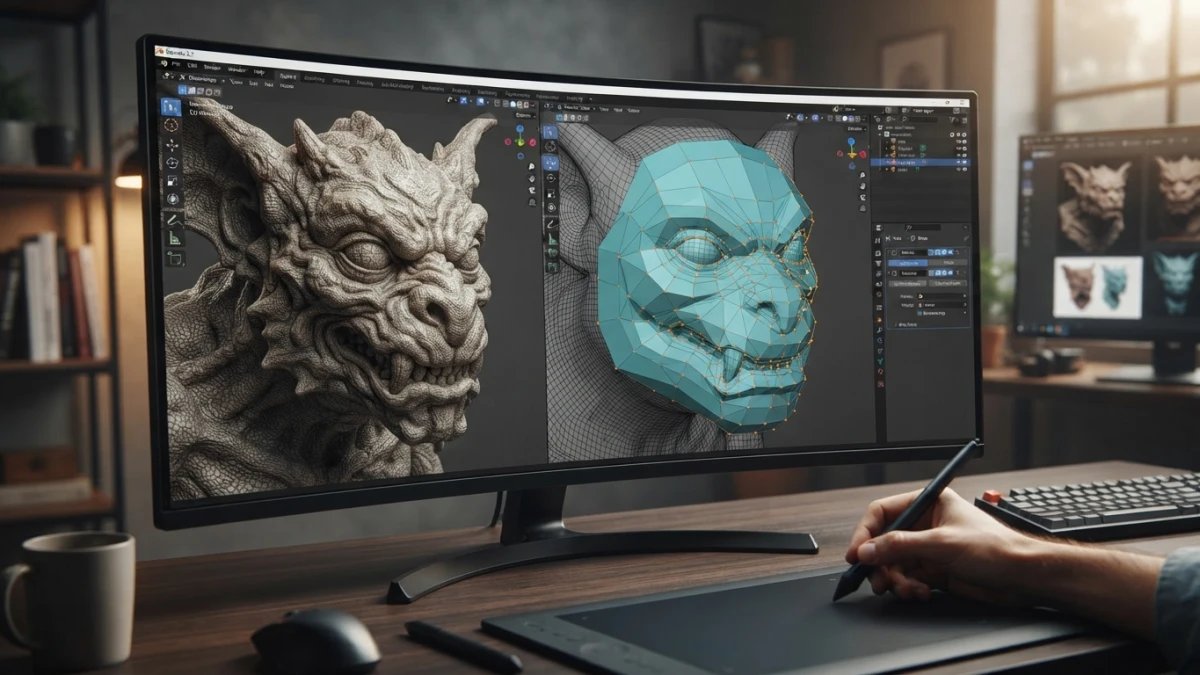
Blender retopology turns a sculpt with millions of polygons into a clean mesh you can unwrap, rig, and animate. In Blender 5.2, a workflow built around Poly Build and Shrinkwrap gives you control over every deformation area without losing the original shape.
What Retopology Is and Why You Need It
A digital sculpt, scan, or boolean-heavy model may look excellent while being unsuitable for production. Retopology means creating a second mesh over that surface, with fewer polygons and a layout designed for the next stage. Keep the sculpt as a high-poly detail source; the new mesh receives UVs, materials, the rig, and animation.
From a Dense Sculpt to a Production Mesh
The new mesh does not need to reproduce every wrinkle. It needs to describe the silhouette and important deformations with a sensible polygon budget. Add density around eyelids, lips, and the nose; a static back or hidden surface can use far fewer faces. Good topology saves memory and makes normal baking predictable.
When You Need It
Retopology is valuable after sculpting, photogrammetry, a 3D scan, or boolean operations that leave irregular topology. If an object will be rendered once and needs neither UVs nor deformation, automatic remeshing may be enough. If it will be animated, the mesh must follow the anatomy and the intended motion.
Before You Start: Prepare the Sculpt
Save a backup and place the sculpt in a collection named HIGH. Apply the reference object's scale and rotation, calculate normals, and hide unnecessary modifiers. Create a new mesh in a LOW collection, place it near the surface, and use X-Ray or a wireframe display for the sculpt.
Snapping and Visibility
In Edit Mode, enable snapping to Face and turn on Project Individual Elements when vertices need to follow the surface. Temporarily disable snapping when moving selections in depth. Work in regions so a vertex on the face does not accidentally snap to the inside of the skull.
Built-In Manual Tools in Blender 5.2
Poly Build: Start with the Important Planes
Activate Poly Build from the Edit Mode toolbar. Start with a strip around the eyes, mouth, or a joint, then extrude it across the form. The goal is to build loops that follow movement, not to fill the sculpt blindly. Use Ctrl-click to add geometry and move vertices to fit the surface.
Shrinkwrap: Stick the Mesh to the Sculpt
Add a Shrinkwrap modifier to the low-poly mesh and choose the sculpt as its Target. With Wrap Method: Project, choose the axes that point toward the model and add a small offset to prevent flickering. The modifier lets you model a manageable surface while keeping it attached to the high-poly. Inspect the result from multiple views because an incorrect projection direction can send vertices through the sculpt.
Knife, Loop Cut, and Cleanup
Use Knife to solve local flow changes and Loop Cut to add support around joints. Look for flipped faces, duplicate vertices, and stretched areas with Select Non-Manifold and Merge by Distance. Apply Shrinkwrap only after reviewing the mesh, and keep an editable copy of the modifier.
Built-In Automatic Remeshing
Voxel Remesh and QuadriFlow
Voxel Remesh creates a uniform surface and is useful for blocking, but it usually produces irregular quads and does not understand how a character will deform. QuadriFlow attempts to create a more useful quad orientation and lets you target an approximate face count. Treat its result as a starting point and manually repair the eyes, mouth, and joints.
Decimate: When to Use It
Decimate reduces polygons while preserving the broad shape and can work well for rigid objects or an intermediate version. On characters it can destroy edge loops and place triangles in deformable areas. Always run it on a copy and check the silhouette in extreme test poses.
Add-Ons That Save Hours
QuadRemesher provides quad-focused automatic retopology and is a commercial option for complex meshes. RetopoFlow makes manual drawing faster with dedicated tools, while BSurfaces helps build surfaces from strokes and references. Instant Meshes is a free alternative that can generate a useful base. Check compatibility with your Blender 5.x release and inspect the result: no algorithm understands deformation intent better than the artist.
Topology Patterns for Characters
Edge Loops Around Eyes and Mouth
Use concentric loops around the eyelids and connect them into the cheek and forehead. Around the mouth, create loops that support closing, smiling, and speech. Add several segments at shoulders, elbows, knees, and hips. Increase density where the silhouette changes or facial expression needs precision.
Poles, Quads, and Deformable Areas
Quads make subdivision and editing easier, but poles are not automatically mistakes. Place them on flatter surfaces and away from highly visible creases. Avoid ngons and triangles around lips, eyelids, and joints because they can cause pinching or broken shading when the rig deforms the mesh.
Complete Example: Retopologizing a Stylized Character
Body, Face, and Hands
Begin with moderate density on the torso, continue through the neck and shoulders, and let loops travel around the armpits. On the face, prioritize eyes and mouth before filling the forehead. Hands need loops at every joint, but the palm can use fewer faces. Add a temporary subdivision and test the mesh in a pose.
Next Step: Bake the High-Poly Detail
Once the low-poly mesh has clean UVs, keep the sculpt as the high-poly source and bake its details into normal maps. Before baking, check scale, names, smoothing, and the projection cage. A normal bake lets a lightweight mesh display the sculpt's pores and cuts through shading.
Conclusion
Blender retopology works best as a production decision: automate the blockout when useful, then draw the deformation zones yourself. Prioritize anatomical flow, a consistent density, and pose-based checks so the character reaches rigging and baking without surprises. Explore more Blender 3D design guides on Blender Deluxe to complete your pipeline.














